Monday, November 18, 2013

New Mexico Green Chile Stew


1-1/2 lbs Beef Stew Meat
2-3 T Olive Oil
2 Onions, diced
2 Cloves Garlic, minced
4 C Chicken Stock
4 Potatoes, cubed
1 Red Bell Pepper, diced
3 C Roasted Green Chile, seeded and chopped
2 T Cilantro
2 T Salt

Cut meat into ½” pieces.  Heat oil and brown meat.  Add onions and continue to cook until onions are brown on the edges.  Add garlic and continue cooking for a couple of minutes.  Add stock and bring to a boil.  Add potatoes and simmer 2 hours.  Add diced red peppers and cook for another 30 minutes.  Add green chile, cilantro and salt.  Cook an additional 20 minutes.  See below for thickening options. 
Serves 8

~Source: Santa Fe School of Cooking, as modified by Lois Ellen Frank (Chef, Instructor, Cook Book Author and James Beard Award Winner).
 
Patti’s Notes: Lois said to remove any silver skin from the beef but leave fat (fat adds flavor).  I doubled this recipe so I browned the beef in batches and transferred each batch into my soup pot.  When I got down to the last batch of beef I added the onions and sautéed them together.  Russet potatoes are too starchy.  Lois used white potatoes, I used baby red potatoes.  I bought fresh roasted green chiles at Food City (local Mexican grocery store).  Lois used a couple of chiles that they roasted to show us how and then supplemented the majority of the chiles with frozen New Mexico Green Chile, already roasted, seeded and diced (and defrosted).  I actually saw those, much to my surprise, at Super Walmart. 
Thickening: When the stew was done Lois took a couple of cups of stew (meat and all) and put them thru the blender then added the blended stew back to the pot.  I used my magic wand (Immersion Blender) being careful not to touch the sides or bottom of my clay pot. 
When the allotted cooking time was completed I left the pot on low for about 2 hours.  I made this for a dinner party so I transferred the Stew into a crockpot to keep it hot while serving. I served it in coffee mugs. 
Completely delicious. 

Blue Corn & Green Chile Muffins with Pinon Butter


Blue Corn & Green Chile Muffins
¾ C Softened Butter
½ C Sugar
5 Eggs
½ C Milk
1 C Corn
1 C Jack Cheese, grated
1 C Cheddar Cheese, grated
¾ C Roasted Green Chile, diced
1 C All Purpose Flour
1 C Blue Cornmeal
2 t Baking Powder
1 t Salt
Pinon Butter (recipe follows)

Heat oven to 375º; grease muffin pans for muffin cups (makes 2 dozen)
Cream butter and sugar in mixer until smooth. 
In a separate bowl whisk eggs and milk together.  Slowly add the egg/milk mixture to the butter/egg mixture until well combined. 
In a separate bowl mix flour, cornmeal, baking powder and salt.  Add corn and chile and mix.  Add dry ingredients to wet until combined.  Add cheeses and batter and mix until combined.  Fill muffin cups about ¾ full.  Bake about 25 minutes.
 
Piñon Butter
1 Stick Butter, softened
1 T Honey
Salt to Taste
½ C Piñon Nuts, toasted

With spoon cream butter, honey and salt together.
Toast Piñon in a pan until heated.  Pulse nuts in food processor until fine (minced not paste).  Add to butter and refrigerate.  Can be frozen for several weeks.

~Source: Santa Fe School of Cooking, as modified by Lois Ellen Frank (Chef, Instructor, Cook Book Author and James Beard Award Winner).

Patti’s Notes:
The original muffin recipe called for adding the corn, chile and cheeses to the wet ingredients (egg/butter) before adding in the dry (flour).  Lois added the corn and chile to the dry so that the flour coats the vegetables which eliminates them clumping together.  Then she added the cheeses at the end.  I used the Lois method and I think they turned out great.  The corn and chile seemed perfectly distributed throughout.
I purchased Blue Cornmeal at the cooking school.  I haven't tried to find it locally so I'm not sure how readily available it is.  You can buy it on-line at:
http://santafeschoolofcooking.com/On-line_Market/Specialty_Foods/index.html#sthash.oitc2Abr.dpbs
For the Piñon Butter, the school did not have piñons so she substituted pecans.  She said you could use just about any kind of nuts.  I had Roasted Piñons that were already salted so I didn’t add more salt and I didn't toast them since they were already roasted. My Immersion Blender has a little chopper/grinder attachment so I used that for the mince the nuts. 

Tip of the Day: Speaking of butter and salt, use the unsalted butter for baking, use the salted butter for table use and other recipes (such as nut butters). 


Chicken Quesadillas with Salsa Fresca

 
Chicken Quesadillas
16  7-8” Flour Tortillas
1 lb. Monterey Jack Cheese, shredded
4 Jalapeño Peppers, diced
1 ½ lbs Cooked Chicken, shredded
1 Red or White Onion, sliced
1 T Ancho Chile Powder
Pureed Chipotles en Adobo to taste (optional)
3 C Shredded Cabbage*
2 C Sour Cream
2 C Salsa Fresca (recipe follows)
 
Sauté onion, added shredded chicken, chile powder and pureed chipotles. 
Cover tortilla with cheese, a layer of chicken, a sprinkle of jalapeños, a layer of cheese and top with another tortilla.  Heat on griddle or grill until cheese is melted bake at 350º for 15 minutes.  Cut into four pieces.  Garnish with cabbage and sour cream. Serve with Salsa Fresca on the side. 
 
 
Salsa Fresca
4-5 Roma Tomatoes, diced
1 t Garlic, minced
½ C Red or White Onion, finely chopped
¼ C Fresh Lime Juice (1 lime)
1-2 Jalapeños, seeded and finely chopped
3 T Cilantro, coarsely chopped
1 T Olive Oil
Salt to Taste
Combine all ingredients.  Let sit 30 minutes prior to serving.  You can use a large spoon or potato masher to give a more pureed effect or leave ingredients intact for more texture. 
 
~Source: Santa Fe School of Cooking, as modified by Lois Ellen Frank (Chef, Instructor, Cook Book Author and James Beard Award Winner).
 
Patti’s Notes:
For the Chicken Quesadillas I double the recipe and used two Costco Rotisserie Chickens (breast meat only).  I used red onion. I added the lime zest as well as the juice.  I couldn’t find Pureed Chipotles en Adobo so I bought a small can of Chipotles in Adobo Sauce and pureed them in my chopper.  I used about a tablespoon of the puree.  I used half Jack Cheese and half Mexican Cheese Blend.  I didn’t use all the diced jalapeños not knowing how spicy people like their food.  I put the remaining diced jalapeños in a bowl next to the sour cream and salsa so people could add spice if needed.  To heat the quesadillas I used my Panini Press.  This worked great since it heats both sides at the same time.  I used a pizza cutter to cut the quesadillas in quarters.  Next time I'll bump up the spices a little. 
The original recipe called for the Purple Cabbage to be used as a garnish.  Lois added ¼ cup of apple cider vinegar, the juice of one lime and a big pinch of salt and made it more like a slaw.  We thought it needed a little sugar so I also added a giant pinch of sugar to mine.  Meh.  Personally, I like my own slaw recipe better. 
For the Salsa Fresca I used red onion and also added the zest of the lime in addition to the juice.   I’m not much of a fan of cilantro so I didn’t add as much as the recipe calls for.  I didn't mash it, I left it chunky.
 
Tip of the Day: I think zest adds another layer of freshness so I always use it when I’m making a recipe with lemons, limes or oranges.


Sunday, November 17, 2013

Party Piggies

1 Lb  Sweet Italian Sausage Links (1 package of Johnsonville)
1  Sheet Puff Pastry (thawed)
1  Egg
2 Tbs Mayonnaise
2 Tbs Dijjonaise
¼ C  Apricot Pineapple Jelly
Cut the sausage links into 36 half- inch slices; brown the meat on both sides in a frying pan over medium high heat. No need to fully cook at this time, all you want is to get both sides a little crispy. Set aside on a plate to cool while you get the pastry ready, lay the pastry out on your work surface then break the egg into a small dish and brush the entire surface of the pastry. Using a mini star cookie cutter cut out 36 shapes from the pastry. Place the meat onto a baking sheet and cover each one with a piece of pastry and secure in place with a tooth pick. Bake in a 400 degree oven for 18-20 minutes. While the piggies are baking mix the jelly, mayo and mustard in a small dish, these are good served hot, warm and room temp. Dip and enjoy!
 ~Source: Pinterest modified from Drunkin Cooking
 
Patti’s Notes: I removed the casing from the sausage and cut each link into 6 pieces before browning.  I personally think when the casing is cooked it gets really chewy like a rubber band (YMMV).  I didn’t have a small fancy schmancy star cookie cutter so I just cut the puff pastry with into squares with a knife.  I lined the cookie sheet with parchment paper for fast and easy clean up. I used apricot jam the first time I made them and orange marmalade the second time. Both times I’ve made these I’ve tossed half of the unused dipping sauce so next time I’ll only make half the sauce.  These were great hot and still good at room temp.


Saturday, September 21, 2013

Shaved Zucchini Salad with Parmesan Pine Nuts (or Pepitas)


2 lbs Zucchini (about 4)
¼ cup Toasted Pine Nuts (I used Pepitas, roasted pumpkin seeds)
¼ cup fresh Basil (cut into strips)
1 small wedge Parmesan Cheese
1/3 cup Extra Virgin Olive Oil
2 Tbsp fresh Lemon Juice
½ tsp fresh cracked black pepper
1 tsp Kosher Salt
¼ tsp dried Red Pepper Flakes

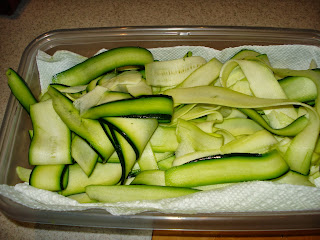
Using vegetable peeler, peel zucchini into strips (see below).  Place zucchini ribbons in bowl and add pine nuts (or pepitas) and basil.  Using peeler shave parmesan into bowl.  Reserve a few parmesan ribbons for garnish. 
Whisk olive oil, lemon juice, salt, pepper and crushed red pepper in small bowl to blend.  Add dressing, toss to coat.  Garnish with reserved parmesan ribbons. 
 ~Source: recipe found on Pinterest and tracked back to original at Epicurious.  

Patti’s Notes: To shave zucchini into ribbons, hold zucchini at an angle and remove the first strip with vegetable peeler and discard.  Then working from top to bottom ‘peel’ down each strip until you hit the seeds.  Turn zucchini over repeat, removing first strip and shaving zucchini into ribbons until you hit the seeds.  Do this on all four sides until all you have left is the core of seeds.  I put them on a paper towel to remove some of the moisture.  I use a kitchen scissors to cut the basil leaves into ribbons.
This recipe traveled well to a pot luck.  I didn’t want to mix the salad at home because I was concerned it might get soggy.  I put a paper towel in a plastic container, put in the zucchini ribbons and folded paper towel over the top.  I put the basil, pepitas and shaved parmesan in individual zip top bags.  I put the dressing in a separate container.  When I arrived at the party it only took a minute to remove the paper towel, add the rest of the ingredients and toss the salad. 

Easy Meter: Super easy schmeasy. 

Healthy Meter: Rates high on the healthy meter and is also vegetarian and diet friendly. 


Monday, July 15, 2013

Spiced Peaches


2 1/2 pounds Fresh Peaches (about 6 depending on size) peeled, pits removed, sliced
2 cups Brown Sugar
1 1/2 cups Apple Cider Vinegar
2 Cinnamon Sticks
4 Cloves (whole)
6 Star Anise (whole)
1/2 teaspoon ground Allspice

Plunge peaches in boiling water for 30 seconds for easy peeling.  I use a potato peeler.  Remove pits and slice each peach into 8 slices. 
Put peaches in jars, don’t overcrowd.
In a medium saucepan combine sugar, vinegar and spices. Bring to a boil, reduce heat and continue boiling 3-4 minutes. Remove from heat.  Remove the cinnamon sticks, star anise and cloves from the liquid.  Please spices equally in jars. Pour liquid into jar over peaches.  If you need a little more liquid add boiling water.  Fill to within 1” from the top of the jar. Place lids on jars and leave out for one hour.  Refrigerate for 24-48 hours, gently turning the jars occasionally upside down and back upright to distribute the sediment from the bottom.
Since this is a refrigerated canning method it is recommended that they be used within 2-3 weeks. 
~Source: I combined the best of three recipes I found on the internet so I guess that’s the magic number to say this version is MINE. 
Patti’s Notes: To remove pits I cut the peach in half and twist which usually works but if your peaches aren’t very ripe you may have to cut in half again in the other direction and coax out with your knife.  Then cut each half into four slices. 
Serving Suggestions: Serve warm as a side dish for grilled meats or sausage. Serve cold as toppings for ice cream, pancakes, waffles, cottage cheese. Serve over ice as an adult beverage with vodka or sparkling wine. I’m also seeing it on top of pound cake or Angel food cake (with or without ice cream and/or Cool Whip). 
 
Experiment # 1: Cocktail time. I made a cocktail with 2 tablespoons of the spice liquid, two peach slices, a shot of vodka, added ice and topped 7-up.  :TwoThumbsUp: 
Experiment # 2: For breakfast I topped some Greek yogurt with the spiced peaches.  Meh.  It was okay but a little too tangy (and I like tangy).  I think it would be better over cottage cheese for breakfast. 
Experiment # 3: Waffle, spiced peaches, Cool Whip Lite = M-M-Good. 
Maybe next time I’ll make Spiced Pears using the same method.  Spiced pears, not so good.

Tuesday, June 25, 2013

Chicken Tortilla Casserole


I created a good chicken tortilla casserole last night.
I saw a recipe on TV but it was more time consuming than I wanted to invest so I used the basic concept and improvised.
I had bought a rotisserie chicken at Costco (my ole standby) and shredded the breast meat.
Instead of making the gravy/sauce from scratch* (my preferred option when I want to spend more time in the kitchen) I used a can of Healthy Request Cream of Chicken Soup, 1 cup of Light Sour Cream, about half a can of diced green chiles (drained) and used the empty soup can to measure half a can of low sodium chicken stock to thin the sauce down a little.
In a 9x11 pan, I sprayed the bottom with Pam, added just a little of the sauce to barely coat the bottom of the pan, overlapped 6 corn tortillas, topped that with half of the shredded chicken and topped that with shredded sharp cheddar, topped that with half of the sauce. Rinse and repeat, except the second layer of cheeses was Mexican Four Cheese Blend (cuz that’s what I had in the fridge, not enough cheddar; not enough four cheese blend but enough if I used both). Make sure there aren’t any tortillas sticking out of the sauce or they will get hard and rubbery. Sprinkled the top with salt and fresh cracked pepper. Baked @ 350* for about 45 minutes. Cheap, Easy & Delicious.
You can adjust the amount of green chili according to your taste buds. Mine aren’t a huge fan of but like a little zing.
 

*The scratch method involved boiling the chicken, making a roux with melted butter and flour, adding onion, garlic, milk and the chicken water to make a gravy.


Saturday, January 26, 2013

Pumpkin Spice Crunch Cake


This is really more like a pie in a cake pan
 
2 Cups Pumpkin Puree (or 1 – 15oz Can of Pumpkin)
1 Can Low Fat Evaporated Milk
3 Eggs
1 ½ Cups Sugar
1 Teaspoon Cinnamon
½ Teaspoon Salt
¾ Cups Pecans (Roughly Chop)
¾ Cups Butterscotch Baking Chips
1 Spice Cake Mix (powder only, not prepared)
½ Cup Butter
 
Preheat oven to 350°
9x13 pan – sprayed with Pam
 
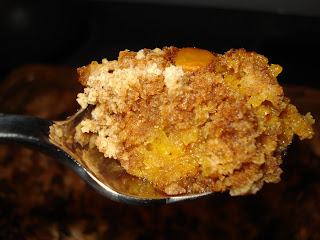
In mixing bowl combine pumpkin, evaporated milk, eggs, sugar, cinnamon and salt.  Pour into pan.  Sprinkle cake mix over pumpkin mixture.  Top with pecans and butterscotch chips.  Cut butter over the top*.  Bake for 55 minutes.
 
~ Source I found it on the internet where it had been altered from the original source and then I read comments and altered it some more. 
 
Patti’s Notes: My alternations were using low fat evaporated milk instead of regular because that’s what I had in the pantry.  The original recipe that had already been altered called for ½ cup of pecans but the alternated recipe had increased that to 1½ cups for more crunch.  I added the butterscotch chips so I split the topping into ¾ cups each of the nuts and the chips.  The recipe I found used a yellow cake mix but several of the comments suggested the spice cake mix instead.  I also cut the butter to ½ cup instead of the original 1 cup, which I think was plenty. 
*The recipe I found called for melted butter.  One of the comments said her Mother used to freeze the butter then grate it over the top.  She felt it made more of a crumble then the melted butter.  I had butter in the freezer so I used that.  Have you ever tried to grate butter?  I don’t recommend it.  What a mess.  After I grated part of the stick I took out a potato peeler and ran that over the stick of butter instead (think butter ribbons).  That worked fine and was more successful than the grater but once it dwindled down to a smaller piece I used a knife and cut the remainder in slices.  Next time I will still use the frozen butter but I’ll cut it from the get-go.
This turned out incredibly delicious.  I would say it’s more like the texture of a pumpkin pie with a crunchy topping.  It is not cake-like at all.  The cake mix kind of melts into the custard. 
 
Easy Meter: Pretty easy (except the frozen butter experiment, which wasn’t difficult, just a waste of time).